Here is the first draft of the cover of my open-source demonstration book, Just Lorem Ipsum. The book has been the subject of previous posts (Just Lorem Ipsum and Just Lorem Ipsum – Scribus Template). The cover was produced using open-source software, specifically the raster graphics program, the GIMP, and the vector graphics program Inkscape. In this post I discuss how the cover was produced and provide the source files to get you started.
Original Concept
 If you have downloaded the .PDF for the interior of Just Lorem Ipsum, which is available in this post, then you might have read the section in the appendix that concerns the cover. As you will see the original concept bears little resemblance to the cover I am presenting here. Sigh. The story is that I made the cover that I had envisioned and I didn’t like it much.
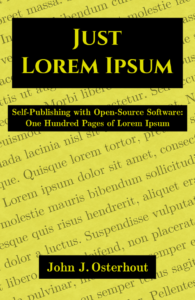
A cover very similar to the one I originally envisioned is shown at right. I produced this cover almost exactly like I described in the appendix of Just Lorem Ipsum. I mocked the whole thing up in Inkscape. The top layer was a clear rectangle with a one pixel red border. I output a .png file, opened it in the GIMP and used the Crop Tool to cut out the cover-sized part inside the red rectangle. Then I exported a full-size .png file and a two x three inch .png file that is the file I used for the graphic at right. I deemed this cover merely adequate. I could have used it and it would have cost me $0.00, but I just wasn’t happy with it. So I started over.
Template from CreateSpace
I used the CreateSpace cover template tool to build a template for my book. In order to use the template, you have to know how many pages you have and whether you will use white or cream paper. These two factors determine the spine width. The cream-colored paper is a tad thicker than the white paper. For the purpose of making the front cover, I only used the template to determine the front cover size including the bleeds. When I make the final cover, I’ll go back to the template.
Current Cover
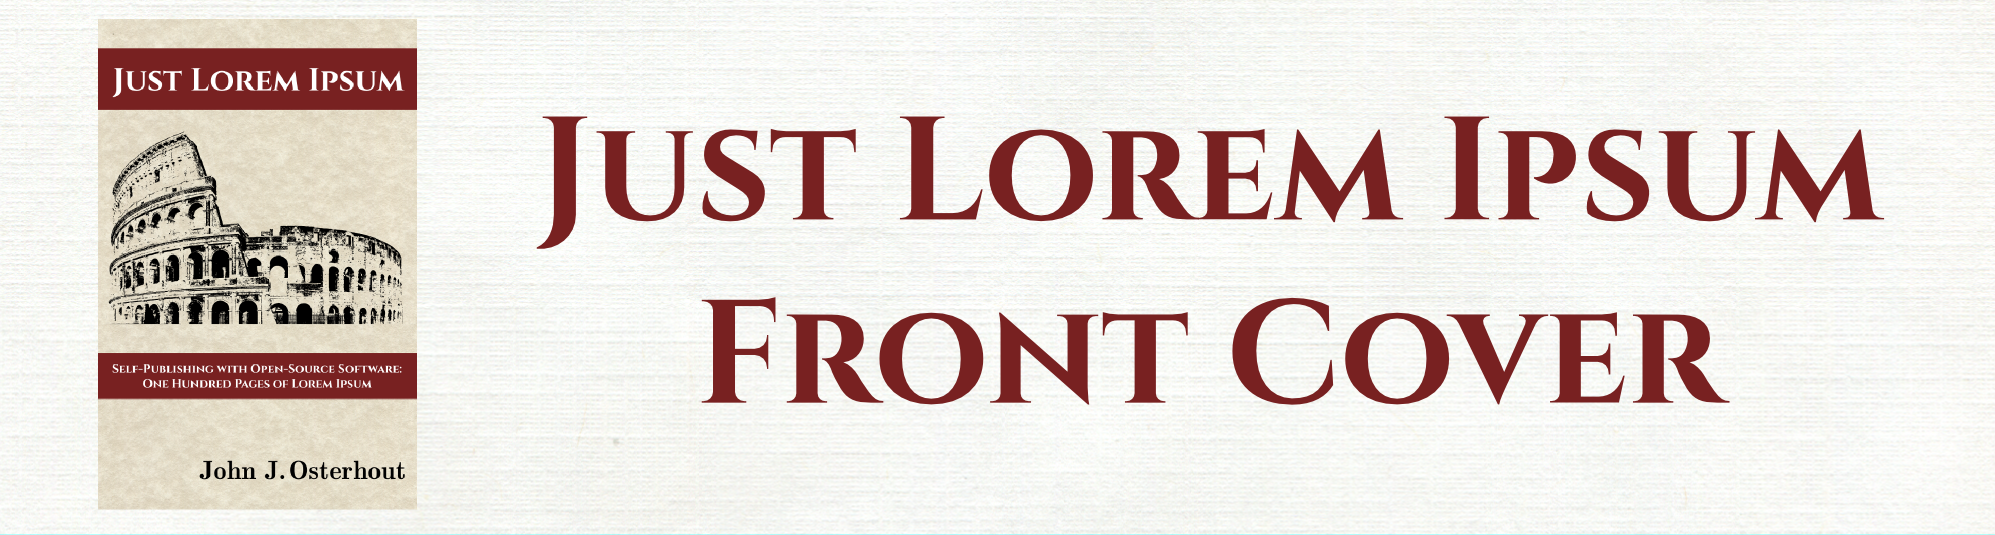
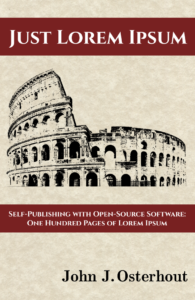 The current front cover is shown at right. I decided to include a graphic on the cover. I thought the Colosseum in Rome (also known as the Flavian Amphitheatre) might be appropriate for a book in faux Latin. I used a photograph of the Colosseum that I licensed from Shutterstock. I could have used a picture “from the internet” but I wanted to avoid any copyright hassles. The license for the picture cost $10.00 and was worth the price of peace of mind.
Colosseum Graphic
The picture of the Colosseum was originally just a color shot of the ruin complete with tourists. I transformed it to the poster-like view you see at right using the GIMP.
- I used the Crop Tool to crop the picture tightly thus removing the trees and bushes at the side, most of the tourists, and a big chunk of the clouded sky.
- I used the Rectangle Select and the Free Select Tools to remove most of the sky and bits of the trees that were left at the sides.
- I used the Eraser and Paintbrush Tools to clean up the edges and to hollow out the arches that were showing blue sky. During this step I painted out some tourists that were on the higher floors.
- I changed the mode to grayscale.
- I turned up the contrast and adjusted the brightness to give an almost black and white image.
- I used the Select by Color Tool to select the blacks and darker grays. I copied and pasted this selection into a new file with a transparent background.
- Voila! A posterized version of the original picture.
Making the Current Cover with Inkscape and the GIMP.
I used Inkscape to make the cover proper and the GIMP to make the final .png files. Inkscape is a vector graphics program so its forte is text and geometric figures that can be output at arbitrary resolution. You can also add bitmapped graphics as you will see. To follow along with the description below, you can download the .svg (scalable vector graphics) that file I used to make the cover: front_v11.svg. There is a layer in the document for each of the graphics elements. Turn on the layers with: Menu – Layer – Layers… Make the layers visible or invisible by clicking the eye next to the name of the layer. Here are the layers from bottom to top:
- Texture. I scanned a piece of parchment-style writing paper and used it for the background.
- Color. This layer contains a rectangle with a yellow tint that is partially transparent. I don’t use it in the current cover, but you can turn it on and off to see the effect.
- Lorem Ipsum. In the original cover concept, I had some Lorem Ipsum text running diagonally across the page. The text is still in a layer but I didn’t use the text in the current cover, either. The text layer is fairly large and slightly transparent. You can experiment with this to see the effects.
- Text. The text layer contains the title, subtitle, author’s name, and their surrounding color boxes.
- Colosseum. The Colosseum layer contains the graphic of the Flavius Amphitheatre. I imported the .png file using Menu – File – Import… .
- Box. The box layer contains a transparent rectangle with a one pixel border. The box is the guide to cut out the part you want using the GIMP. I did not actually need the box with this project, but if I had used the Lorem Ipsum text it would have overhung the rest of the cover and would have needed to be chopped away.
- After I made the file in Inkscape, I exported a .png file then opened it in the GIMP.
- Using the box as a guide I cropped the cover with the Crop Tool.
- I saved the file in the native GIMP .xcf format (just in case…).
- I exported a full-size .png file of the cover and a two x three inch version for use in this post (see above).
- You can also export .PDF files with the GIMP as well as almost any other graphics format.
Onward!
I hope to finish the spine and back cover soon. However, I have some other book projects, travel, and day-job duties coming up so the cover may get pushed back. In the meantime, use the Scribus templates presented earlier and the Inkscape file provided here to further your own projects. Enjoy!